Media > In-depth Exploration of Realtek Visual Designer: A Next-Generation UI Design Tool
In-depth Exploration of Realtek Visual Designer: A Next-Generation UI Design Tool
2025-08-13
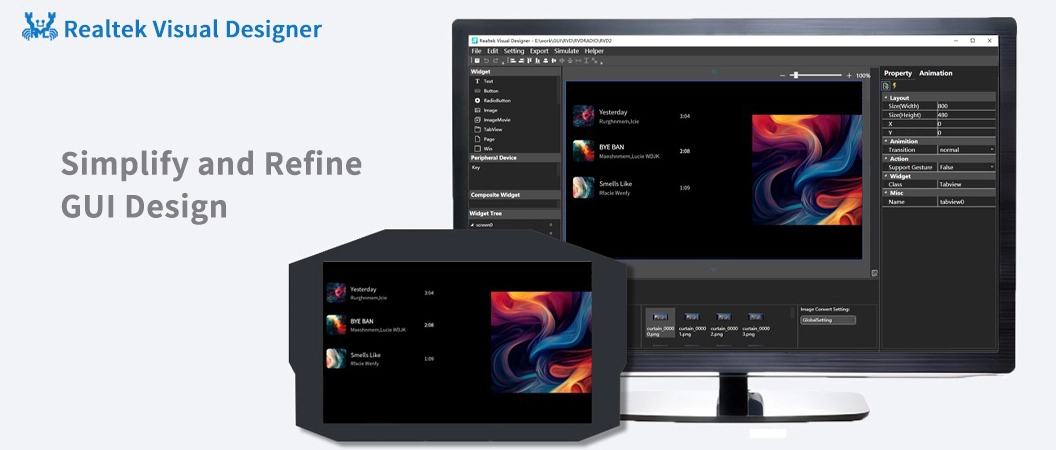
Realtek Visual Designer is a professional tool dedicated to simplifying the graphical user interface design process for Realtek Honey-GUI embedded systems. It supports usage on Windows operating systems and is designed to help developers quickly build simple, user-friendly, and powerful user interfaces. This tool is suitable for a variety of application areas such as smart home panels and smart dashboards, and it significantly enhances design efficiency while ensuring both aesthetics and practicality of the interface.
Realtek Visual Designer supports multiple series of Realtek ICs, including the RTL87x2 and RTL87x3 series, offering both Bluetooth Low Energy and Dual-Mode functionalities. Users can effortlessly build complex graphical interfaces through intuitive drag-and-drop components. Once the design is complete, projects can be exported as .bin files and directly flashed onto Realtek Honey-GUI embedded devices, ensuring a smooth transition from design to deployment.
For engineers focused on software development with Realtek integrated circuits, mastering Realtek Visual Designer is essential. This tool not only improves development efficiency but also ensures the ability to create high-quality graphical interfaces on the Realtek platform.
Revealing Key Features
1. Drag-and-Drop UI Editor: Simplify Operations, Unleash Creativity
Transform complex UI design into an easy "puzzle game" without requiring extensive programming skills. Through simple drag-and-drop operations, various UI components can be precisely added to the design canvas, and their appearance can be easily adjusted using the components' properties view.
2. Rich Component Library: Rapid Construction, Unified Visual Style
Provides a variety of standard components including buttons, labels, images, switches, dropdown menus, text areas, and keyboards, offering a solid foundation for creating outstanding user interfaces. Realtek can also develop highly integrated and customized components based on customer needs to meet unique application scenarios.
3. Low-Code Development: Easy Implementation, Increased Efficiency
By combining a small amount of C/JavaScript code, complete functionalities can be realized, significantly speeding up the process compared to traditional development methods. This helps development teams focus on optimizing business logic and user experience. It reduces dependency on underlying code, lowers development thresholds, allows non-technical personnel to participate, and saves manpower costs. Additionally, the simplified code writing method makes subsequent modifications and updates more convenient, enhancing project flexibility and adaptability.
4. Multifunctional Resource Management: Supports Multiple Formats, Efficient Utilization
Supports importing various common image formats and classifies them efficiently; with image compression function to effectively reduce the size of exported files, ideal for embedded systems with strict Flash storage requirements. Supports importing third-party font files to meet different design style needs and ensures global reuse of fonts through unified management, ensuring style consistency and reducing workload and error probability.
5. GUI Simulation: Pre-validate, Ensure Precise Decisions
Supports simulation running on Windows platforms, allowing developers to validate GUI functionalities before porting, identify, and fix functional defects or logical errors. This process significantly shortens the development cycle compared to discovering and fixing issues after porting.
6. Fast Export and Porting: Simplify Processes, Improve Migration Efficiency
One-click export functionality packages project files and resources into a format directly flashable to Realtek Honey-GUI embedded devices, simplifying the process and making it easier for developers to complete project porting and deployment.
Step-by-Step Tutorial
1. Download: Start Your Design Journey
Visit the official website at RealMCU to download the Realtek Visual Designer standalone version. After extraction, you can begin your design journey.
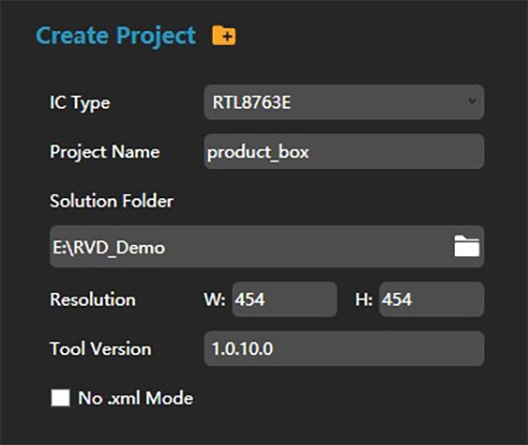
2. Create a Project: Build Your Creative Platform
After double-clicking to open the tool, select the IC type you want to develop, and set the project name, solution path, and screen resolution. Click the "Create Project" button to create a new project, and a blank design canvas will be presented to you, ready for your creative expression.
3. Interface Design in Practice: From Conception to Presentation
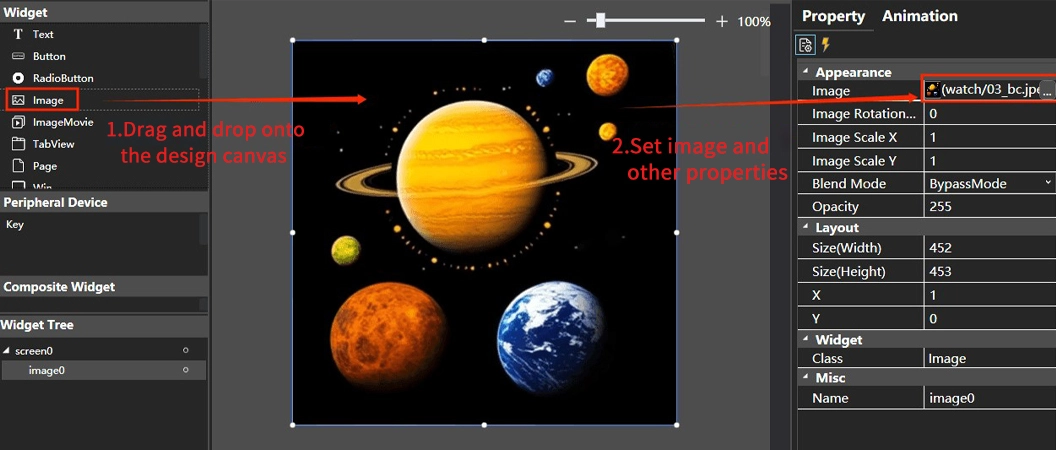
Explore the design capabilities of Realtek Visual Designer by creating a simple clock face.
Step 1: Drag an Image component from the toolbox panel on the left onto the canvas to serve as the background image for the clock face. Adjust the position and size of the image to cover the entire canvas, then select a pre-imported background image.
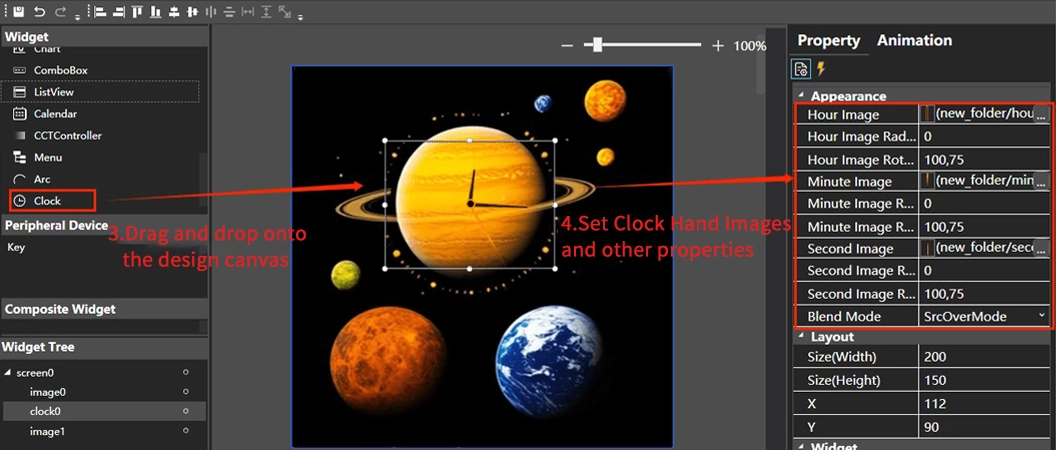
Step 2: Drag a Clock component onto the canvas and set the background images and rotation center for the hour, minute, and second hands.
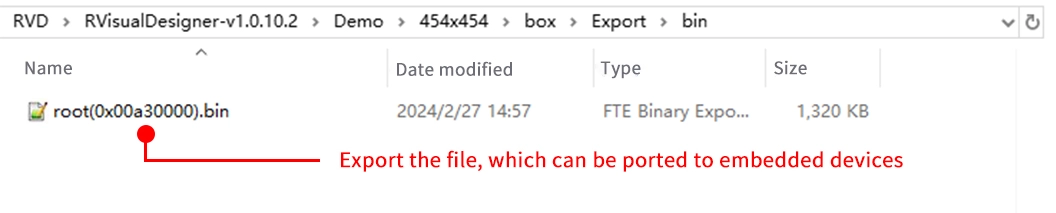
4. Export and Integration: Bringing Designs to Life
After completing the design, click the "Export" button in the menu bar to package the project files and resources into a binary file.
Then, click the "Simulate" button in the menu bar to perform a simulation.

Once the simulation is verified to be correct, the exported files can be flashed into the Realtek Honey-GUI embedded device.
Showcase of Successful Cases
Using Realtek Visual Designer, developers can easily design intuitive and aesthetically pleasing smart home control panel interfaces.
The following are functional pages included in the smart home panel example:
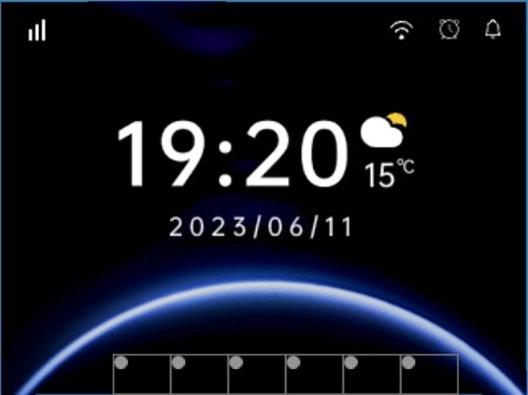
1. Home Page
Add Text components to display information such as the current date and weather conditions.
Use Image components to set the background of the homepage.
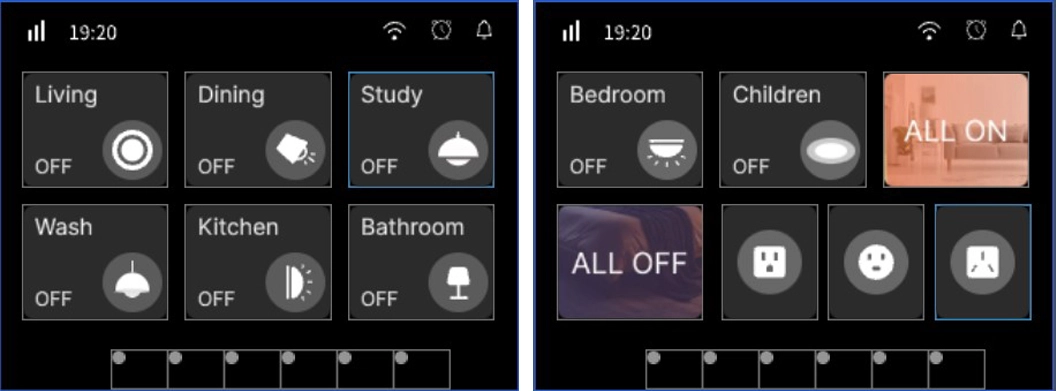
2. Smart Lighting Control Page
Place multiple Switch components to control lights with different functions.
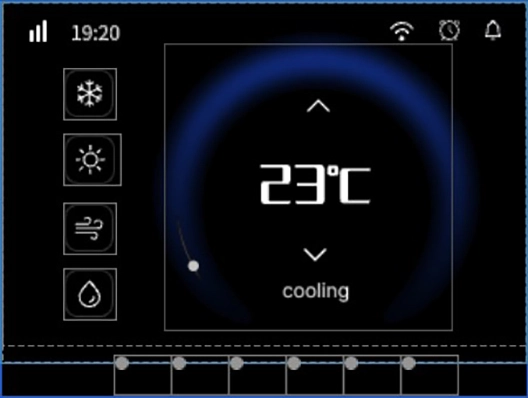
3. Smart Air Conditioning Control Page
Use Button components to adjust cooling, heating, air swing, and dehumidification modes of the air conditioner.
Add Text components to display the air conditioner temperature and current mode.
Use Slider components to enable drag adjustment of the air conditioner temperature.
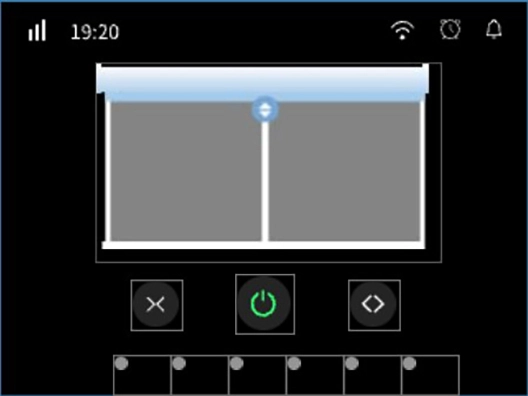
4. Smart Curtain Control Page
Integrate Image Slider components to adjust the curtain's opening and closing progress and state through a set of curtain state images.
Use Button components to control the opening and closing of the curtains.
These examples showcase the rich functionality and ease of operation of Realtek Visual Designer in designing smart home panels. If you have any other ideas or suggestions, feel free to discuss and exchange thoughts at any time.


 苏公网安备32059002006558号